SixSevenEight

SixSevenEight

Wednesday, April 10, 2013

Interconnecting Meals: Bacon Wrapped Chicken and Vegetable Soup

We recently pounced on a random sunny day for the first grilling session of 2013 and made grilled chicken sausage sandwiches that had special caramelized onions and a bell pepper relish. After that delicious meal we still had a good deal of the onions and relish leftover:


Rather than letting them languish in the fridge until they went bad, we interconnecting our meals that week by using those leftovers in our next two meals - baked bacon wrapped chicken and a vegetable soup. For the chicken, I've lain down several strips of bacon in an oven safe pan and then set on a few pieces of bone-in chicken thighs, seasoned with cracked pepper.


Next I'm stuffing the onions and relish under the skin of the thighs. If you want to go skinless, you could instead use chicken breasts, slice them open, and stuff the relish inside.


Here's all three pieces stuffed and rubbed down with some of the excess relish sauce.


We're not quite done yet though! To add some more delicious flavor we're topping them with shredded cheddar.


After all the ingredients are in place, the bacon is pulled up and wrapped around each piece. This is much easier (and less messy) to do if you set the bacon on the bottom layer first.


The chicken is baked covered for about 45 minutes and then finished uncovered for another 10 - 15 to let the bacon crisp up. Notice the amazing drippings in the bottom - we're going to save those for the vegetable soup later.


Here I've got some bacon wrapped wonder, but with a salad of course! We need something healthier to go with all that fatty meat and cheese.


The next day we made a vegetable soup, which is going to start with the pan drippings from the bacon wrapped chicken, adding a serious flavor punch.


Our base veggies will be chopped onions, celery, and carrots.


The vegetables are first cooked in the drippings to get soft and soak up all the flavor.


To make this a little heartier we also diced up a little bit of leftover chicken. If you didn't want to go that route however, you could add in another veggie like potatoes, or use something that thickens well like barley or orzo pasta.
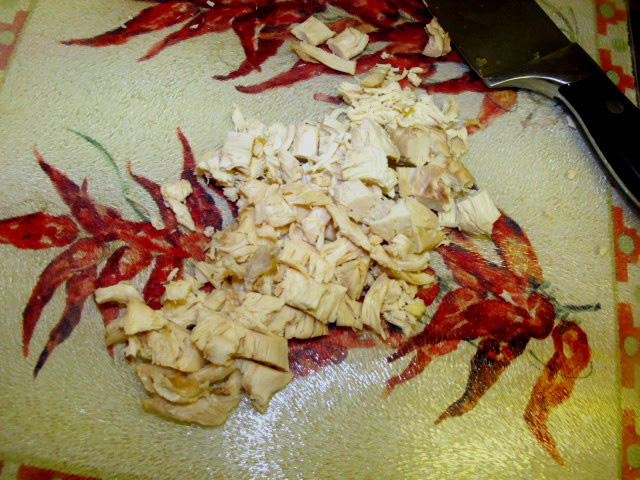

The chopped chicken is tossed in with the now-softened vegetables, which are smelling great!


We also had a bag of frozen corn, which went in for more color and texture.


Instead of our standard homemade stock, we decided to do a tomato-based soup. Megan is pouring in a can of Fire Roasted Tomato Soup Starter. Normally these go for around $3, but we found them at Big Lots for 50 cents a piece!


Here's the soup as it's starting to near the end of the cooking process.


For even more vegetable goodness, we're also adding in about a cup of a store brand tomato sauce similar to V8. If you want a hotter soup, go with the spicy kind instead.


And here's our finished soup - hearty and wonderful, and bursting with all kinds of flavors.


For some crunch, we threw in pieces of pita chips. You could also do croutons or anything else that happens to be inhabiting the cabinet.


Monday, April 8, 2013

Grilling Season 2013 - Chicken Sausage Sandwiches With Red Pepper Relish

It's way, way early, but we've been having a few nice days on and off and decided to pounce on one for the first official grilling of 2013! Of course now two days later it's snowing and there's a winter storm warning...

Kicking off grilling season for the year we made chicken sausage sandwiches with caramelized onions and a bell pepper relish. To start this mammoth meal, Megan is frying onions on the stove top in olive oil with chili powder, cinnamon, ketchup, vidalia onion hot sauce, and pepper.


Next we cut two red bell peppers in half and removed all the seeds in preparation of grilling.


After hitting the hot grill in the backyard for a few minutes on each side, we brought them back in and diced them up.


To put together the "relish" we mixed the peppers with garlic red wine vinegar, olive oil, basil, parsley, and garlic powder.


Here's our two "sauces" ready to go on our sandwiches. But before they can get spread down, we've got some meat to grill!


We won't bother rehashing how we grill this time since it's been covered pretty extensively in last year's grilling blogs (for those who aren't familiar, we use a charcoal and a chimney starter). Here we've got a few chicken sausages heating up nicely.


We're also going to briefly grill our sandwich buns to get them a little crispy. First Megan drizzles on some olive oil, then they hit the grill on either side for about a minute.


To put together the sandwiches, slather on a layer of dijon mustard on the buns.


Next spread on a thick layer of the caramelized onions.


Set on  your sausage (or two if you're so inclined!)


Then goes a dollop of the bell pepper relish.


We're of course having our sandwiches with a fresh side salad. Mine had a variety of veggies and a poppy seed dressing.


This is Megan's sandwich and salad, and she went with fruit and vegetables.


We may be on hold for grilling until the snow passes again, but there's still plenty more coming to Six-Seven-Eight soon! Next up is another example of interconnecting meals - as we made the next two dinners of the week utilizing the leftover onions and bell pepper relish for bacon wrapped chicken and a vegetable soup.

Thursday, April 4, 2013

Birthday Potstickers And Pizza Puffs

There's a frozen bag of potstickers Megan and I love getting at the store, but it's fairly spendy and we wanted to try making our own to save on costs and tweak the flavors. Having done this several times now, we decided to make two different kinds of potstickers for my recent birthday bash.

Here we're starting the filling for our potstickers using ground turkey, but we've also had good success with ground pork and chicken as well. Also going into the mix are garlic powder, green onions, soy sauce, dijon mustard, ketchup, eggs, and diced bell pepper.


Everything is thoroughly mixed together so each potsticker has a little bit of everything.


The 'stickers are individually wrapped up in a wonton wrapper - it's a bit time consuming, but can be fun if you get everyone involved.


Here's a cutting board covered in a batch getting ready to go. We tried out several different ways to fold them - pick whichever one looks the best to you or is the easiest to do on a large scale.


The finished potstickers hit the frying pan with some hot oil.


Eventually the bottoms get crispy, giving a crunch on the bottom and a soft texture on the top.


We didn't just do turkey for my birthday, however, as there's another kind of food I'm a fanatic about - anything involving buffalo chicken!  Here we are cooking some diced chicken breast.


Next we threw in green onions and some standard garlic and pepper seasonings.


The seasonings were followed of course by our own homemade buffalo sauce!


Here Megan is putting together one of these non-traditional potstickers with two wonton wrappers - wetting the edges by dabbing her finger in a cup of water and then running it along the edges, spooning in a teaspoon of the filling, and then setting the wrappers over each other.


These can also be made in a large quantity ahead of time and frozen - just be sure to lightly brush them with flour so they don't stick together.


Here we've got some of our second batch of frozen potstickers going.


This is both varieties together - buffalo on the left, turkey on the right. We fried the buffalo ones in more oil for a more crispy finish.


Remember our recent "finger foods" like pull apart pizza or bacon alfredo puffs? We also did another take on a simple, all-in-one snack/meal for the birthday shenanigans. Here Megan has made our regular pizza dough, rolled it out into several small circles, and then topped them with tomato sauce, pepperoni, and three kinds of cheese (gouda, mozzarella, and cheddar).


These little pizza puffs are then rolled up into large balls, like a mini-calzone or stromboli.


Here's several of them together getting ready to go.


After all being rolled up, the tops are brushed with olive oil and dusted with Italian seasonings.


Here they are coming out of the oven, golden-brown on top and gooey and cheesy inside.


And for the big finale Megan had some fun with dry ice and a green appletini Crystal Light punch!


Check back in soon for a new entry in the culinary world tour, more unique pizza creations, and the start of grilling season 2013!