SixSevenEight

SixSevenEight

Thursday, May 21, 2015

Homemade Crumbling Cheese and Street Tacos

Our cheese making adventures have continued steadily since first whipping up a batch of delicious, creamy ricotta last month. Having mastered ricotta and even making some amazing mascarpone, we next tried out a personal favorite: queso blanco.

We've been buying this crumbling cheese for years to use in our pulled pork nachos and other Mexican dishes, so it only made sense to make some at home. Although there are more steps in this process than from ricotta or mascarpone, there's actually less ingredients. All you need here is one gallon of whole milk, 2 tsp. of citric acid, and another tsp. of salt.

If you want to throw in extra herbs or seasonings, cilantro is a good option. Below you can see we're also using a thin sieve and some cheese cloth.


To start this we're cooking the milk slowly to 195 degrees. As soon as it hits the proper temp, we pull it off the heat and add in the citric acid, which will make the curds form.


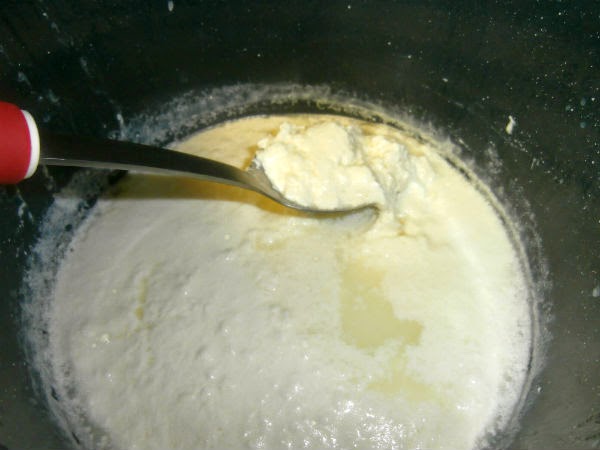
The milk and citric acid is covered and left to sit for a full five five minutes, until the curds and whey separate. Here we're pouring the curds into the sieve and cheese cloth, with a bowl underneath to catch the whey.


After draining for a few minutes, here's our cheese, which will be tasty but isn't yet in the right shape and consistency.


To get it where we want it (and ensure we get that awesome crumbly texture), we wrap the curds tightly in cheese cloth and form it into a wheel shape.


We need to put some constant pressure on the cheese for about an hour. Since I don't fancy standing there pushing down for 60 minutes, I've filled the empty milk jug about 3/4 up with water and am using two plates to squeeze the cheese. This will remove any excess liquid and give us the texture we want.


After an hour the cloth is removed and we've got a wheel just like the "queso fresco" branded cheese you'd get at the supermarket with the exact same flavor and ability to easily crumble. Here's we've crumbled up half the wheel to use for street style tacos and corn on the cob!


This will be a combination of indoor and outdoor cooking, with the corn to be grilled outside, while the taco meat will be pulled pork. We'll make that in the crock pot just like with our game day pulled pork nachos, but we'll use taco seasonings instead of our usual rub.

Mexican street corn is a whole different beast from traditional corn on the cob, as its served slathered in sauce and rolled in cheese. Here Megan has whipped up a sauce of mayo, chili powder, garlic powder, lime juice, and pepper. Feel free to improvise here - throw in any seasonings that strike your fancy!


Here's our cooked corn, pulled fresh off the grill and ready to be taken to the next level.


First Megan is brushing them with the sauce, which will let the cheese adhere to the sides.


Now its rolled in our awesome homemade cheese and ready to be mesilly (and make not mistake - this is messy) devoured.


Here's our corn with the "street" style tacos - a layer of homemade guacamole, some tender and juicy pulled pork, diced tomato, cilantro, a whole mess of crumbly cheese, and a squirt of fresh lime.


Tuesday, April 7, 2015

Cheesemaking: Ricotta!

When it comes to cooking, by and large, making everything at home is always going to be superior to buying at the store. While it takes more work, the flavor can't be beat. From making our own pasta to bbq sauces and guacamole, we've found the extra work is always well worth it when you taste the end result.

Until now we've never tried cheesemaking, but this last week we finally rectified that situation, starting out by making a delicious creamy ricotta right on our stove at home.

To make ricotta you'll need a very large pan - ideally stainless steel but anything that doesn't have a teflon style coating will work - and the following ingredients:
  • 1 gallon whole milk
  • ½ cup heavy whipping cream
  • 2 tsp non-iodized salt
  • 1 tsp citric acid
We use powdered citric acid specifically for cooking, but if you don't want to go hunting for that, you can instead get acid from another source, such as wine vinegar.

Unlike most other recipes, cheese making is an instance where you can't swap out ingredients and still get the same result. Make sure NOT to use ultra-pasteurized milk or iodized salt, as  these can both prevent the curds from forming and you'll just get burned milk instead of cheese.


Mix all the ingredients together and very slowly raise the temperature to 184 degrees Fahrenheit - this is where an instant read digital food thermometer comes in very handy! We turned our stove to the "4" setting and it took about an hour and 45 minutes to hit the right temperature.


Eventually curds will start to form in a layer on the top of the milk. Every now and again be sure to use a rubber spatula to scrape the bottom or you'll get burned cheese. It won't seem like enough curds are forming at first when you finally get up to temperature, but don't worry, you're on the right track!


As soon as you hit 184, remove the pan from the heat, cover with a lid, and let it sit 15 minutes to allow the curds to finish forming. Here's our first batch after the cooling process has finished as we're pulling the curds off the whey.


It's looking good already, but it's not quite done yet, as you still need to strain the cheese.


Here we're using a fine mesh sieve to let the remainder of the liquid whey drain out. Originally we used cheese cloth over the sieve, but we found it wasn't really helping and the cheese just stuck to the cloth, so eventually we went with the sieve alone. After the drip dry finishes, this is the time to taste test - if you want, you can fold in either extra salt for more flavor, or extra cream if the ricotta is too thick.


To serve our ricotta we're using baked bread and some garlic cloves. Here we've chopped the top off a few garlic cloves, covered with olive oil, sea salt, and pepper, and wrapped in tin foil. Cook the garlic packet in the oven at 400 degrees for about 35 - 40 minutes.


Squeeze the garlic out of the cloves into a small container and mash them up with olive oil and balsamic vinegar. Add in a dash of pepper for an amazing dipping sauce!


Here's our finished ricotta - topped with some extra olive oil - served with baguette slices and some spinach and mushroom artisan bread we found at the local grocery store.


You can top any of the bread with the cheese, or just straight up eat it with a drizzle of olive oil and pepper. Ours was significantly more creamy and flavorful than the ricotta you'll find at the grocery store, and it was amazingly worth all the extra effort!


Wednesday, March 18, 2015

Culinary World Tour: Elana Ruz Cuban Sandwiches With Fried Plantains

The world tour finally continues! This time around we decided not to keep going in order but took a detour to head down to Cuba. Before heading into the specifics, be sure to check out our previous stops on the culinary world tour:

Spain: Grilled Paella
England: Yorkshire Pudding
Ireland: Shepherd's Pie
Iceland: Lamb Pie With Rye Crust
Greenland: Suaasat
Canada: Poutine
Mexico: Posole

For the Cuban stop we decided to go with iconic fried plantains and a twist on the classic cubano sandwich: the Elena Ruz.

Rather than picking up bread at the bakery, we went the route of making our own, and let met ell you, this was an aaaaaaaaaaaaaaaaaaaaal day experience.

First we heat up the yeast with water and sugar so it will activate properly.


We're also going to need four beaten eggs to add in shortly.


While the yeast is heating, we'll get our dry ingredients together, using both regular white flour and bread flour.


Once the yeast has puffed up, we're adding in a mixture of beaten eggs and honey.


The yeast mixture is then combined into the dry ingredients in small batches - about 1/5 of the mixture at a time, which is whisked together until incorporated.


Now the real work begins: its time to knead the dough until elastic - 20 solid minutes by hand! This is more difficult than you'd think, and its times like these we wish we had a heavy duty Kitchenaid mixer!


Now its time to play the first waiting game. Oil up the bottom side of plastic wrap to cover the dough in a large pan, and then refrigerate for four hours.


Next we pull the chilled dough out of the fridge and let it rise for two hours.


Now we punch it down and let it rise yet again. We're starting to think we should have done this earlier in the morning!


After all the rising is finally done, we roll out the dough and shape it into small rectangles for the sandwiches.


Here Megan is brushing the shaped dough with melted butter.


15 minutes in the oven, and we've got these amazing looking (and smelling!) sandwich rolls that perfectly pull apart!


We're not done cooking yet though. Now it's time to assemble the sandwiches. For an Elana Ruz Cuban, we're using thick turkey, cream cheese, and strawberry preserves.


Once it's all assembled, we top it with melted butter again and cook it on the skillet - but to make it a true Cuban, be sure to place a heavy cast iron skillet on top to press it down and cook the top.


Don't forget about our side - fried plantains! If you haven't had these before, don't try eating them straight up: they're gross! But when you cook 'em up proper, they become a thing of beauty.


After the insane peeling process (trust me, a knife is required), we pull off thin strips of plantain by using a vegetable peeler. We're going to fry them up in a skillet with about a half inch of hot oil.


Toss a little salt on your fried plantains and it's time to dig in!


Wednesday, January 14, 2015

Novel Noodles: Homemade Pasta Two Ways

With our focus on homemade meals and conquering new culinary territory, it was only a matter of time before we ditched box pasta and started making our own.

Done by hand, making pasta at home can be quite frustrating, but with a couple of tools like a mechanical pasta cutter and a drying rack, this becomes a fun way to put together incredible meals.

We've done quite a few pasta sauces over time at Six-Seven-Eight like roasted red pepper sauce, oven roasted fresh tomato sauce, homemade pestos, and the almost sauceless lemon zest and kale pasta. Today we'll cover two more ways to prepare pasta into meals that will make you forget all about restaurant dinners.

There are myriad pasta recipes out there from the very basic to the very complex, and we've found that in most cases simpler is better. For these recipes, our pasta will consist only of:
  • 1 cup flour
  • 1/4 cup Semolina flour
  • 2 eggs
  • 2 tsp. olive oil

To get started, make a well out of the white flour, and then pour the semolina in the middle.


Crack your eggs and pour them in the well along with the oil, and then begin the process of folding it all together by hand until it becomes more firm.


Hand kneading pasta takes a significant amount of effort - a full 10 minutes of kneading is more tiring than you'd think - but there is a possible shortcut if you've got the right kitchen equipment. Most bread machines have a pasta setting, taking care of all the work for you!


Once you've got a solid ball of pasta, roll it up tightly in plastic wrap and let sit for half an hour. Sprinkle some extra flour on the workspace as you'll need it to keep the pasta from getting too sticky.


Slice off about a fifth of the pasta dough and flatten it with your hands in the extra flour.


Here we're going to start rolling out the pasta with our pasta machine. Start at the thickest setting and work your way down to your desired thickness. After rolling it through once, fold the length of pasta in half and then roll it through again at the same setting. Repeat that process at each thinner setting.


Cutting pasta into similar shapes by hand is more effort than its worth, so we're going to run our flattened dough through the linguine attachment for perfect strands of delicious noodles!


Fresh pasta will frequently stick together and become a clump - which you don't want! So either store your pasta on a drying rack like this one, or pour a cup of flour on a cookie sheet, toss the pasta in, and quickly separate each strand by hand so it can sit before cooking.


For our first pasta meal, we're going to use a very basic recipe - canned tomatoes, garlic powder, basil, basil infused olive oil (we got some of these great tasty oils as a Christmas gift and they are fantastic!), sugar, and balsamic vinegar. Mix it all together in a blender or food processor.


Pour your sauce in a pan, bring to a boil, then cover and simmer over low heat for 45 minutes to an hour. This time around we're using whole tomatoes instead of diced, with gives a thicker texture, but also requires adding more sugar, as the addition of tomato seeds will give a more bitter flavor as the sauce simmers down.


To make this more of a full meal without a side, we're going to add in our ground pork and bacon meatballs, but of course the delicious cheese stuffed version works just fine too!


Fresh pasta cooks much, much faster than the store-bought variety, so that gets thrown in a pot of boiling water last, taking only about 4 - 5 minutes.


Toss it all together and get ready for a taste of Italy far better than what you'd get at most sit-down restaurants!


Don't forget some extra Parmesan and pepper on top!


Next up we're going to go a very different direction by making a hearty, down home potluck favorite: chicken and noodles! For this one-pot meal you'll need:
  • 2 bone-in chicken breasts (for serving a large group, use a whole chicken)
  • ½ white onion, chopped
  • 3 carrots, chopped
  • 2 -3 stalks celery, chopped
  • 3 cups water
  • 1 container chicken soup base, bouillon, or stock
  • ½ cup chopped mushrooms
  • ½ lb – 1 lb homemade pasta
  • 1 can evaporated milk
  • salt and pepper to taste
The chicken here serves two purposes: its going to flavor the meal by acting as a stock, and we're going to shred the meat. To get the meat tender enough, boil the chicken in water along with the onion, carrot, and celery.


About an hour later, remove the chicken from the water and discard the skin and bones.


Shred the chicken meat by gently pulling it apart - just dig in two forks and pull them opposite directions. The meat should easily come apart.


Lower the temperature, toss the chicken meat back into the water, and add in the mushrooms. At this point the flavor should already essentially be at chicken stock level, but if you find the taste isn't strong enough you could mix in some extra store-bought chicken stock or bouillon.


We're almost done, so it's time to throw in the noodles! Big thick, long noodles work great here to make this more hearty.


We want to further thicken up the meal so its less of a soup and make it more creamy, so add in some evaporated milk and continue cooking. If it doesn't thicken up enough, mix together a little water and cornstarch and stir in the mixture.


Here's a big simmering pot of finished chicken and noodles waiting to be devoured. Guaranteed to be eaten up if you take this to a pot luck or dinner party!