SixSevenEight

SixSevenEight

Wednesday, January 22, 2014

Asian Noodle Soup

Recently we've been watching "The Mind of a Chef" on Netflix, which covers a lot of Japanese food culture and the many amazing things they do with ramen over there (which has very little to do with our concept of cheap packaged ramen noodles in the States).

The effort that goes into a bowl of authentic Japanese ramen really got me thinking it's something we should try, but I wasn't ready to jump in with both feet quite yet. As a sort of practice run, we put together an Asian noodle soup that's a little less involved.

To start our soup, we're of course making our own stock. Luckily we had made a whole chicken the week before and had the carcass ready to go. Here we're boiling the chicken bones with carrots, bell peppers, and minced garlic in about four cups of water.


For our soup we needed some Asian style ingredients outside the norm of what we're comfortable cooking with, so we picked up a head of bok choy and some rice noodles.

We also wanted to try some more exotic mushrooms, so we went with shiitake and oyster. These are more expensive (between $9 - $12 a pound), but we only needed a handful so it ended up being less than two dollars total for them. We're also using red onion, a red chili pepper, and a bulb of fresh ginger (the gray looking guy in the middle underneath the onion).


We diced or tore up most of the ingredients, which will get cooked on the stove top. The bright yellow slices in the back are the ginger. We've never used fresh ginger before, which has a very interesting taste that's "sharp" without being spicy. Before slicing it you also have to peel off the barky outer skin.


Our soup is going to be topped with slices of meat, and we went with a very thin beef steak. I didn't want a traditional steak flavor though, instead wanting flavors from other cultures, so I coated the beef in cumin instead of pepper or other seasonings.


The steak gets pulled off the heat after it's browned, and then we toss in our diced vegetables to soften.


What's this goop down here? That's our finished stock after it's been strained and placed in the fridge overnight to let the flavors set in.


Our soup will have rice noodles (we used Maifun), which is cooked a bit different from regular pasta. To cook this, bring a pot of water to boil, throw the noodles in, then turn the heat off and let it sit for 10 minutes. It's ready immediately, so if the rest of the meal isn't prepared yet, strain out the water and then toss the noodles in a bowl of ice.

The rice noodles are tossed in directly with the vegetables, and then we ladled in a few cups of stock. Everything cooks for a few minutes so the stock can flavor the noodles.


Here we start constructing our soup bowl by spooning in a handful of noodles and vegetables.


Next we ladle the stock over the noodles - just enough to cover them, but not enough to fill the bowl.


We finish off the bowl by layering on sliced beef and cracking open a beautiful soft boiled egg. For more heat you can also drizzle on some sriracha hot sauce.


Despite all the interesting ingredients going on here, the end result was a subtle and somewhat bland flavor in the soup itself, and unfortunately Megan didn't like it at all. I actually enjoyed it, but if we do this again I'll definitely change up some of the seasonings for a stronger flavor. I'm glad we made this though, as the experimentation was worth it and the fresh slices of ginger were fabulous.

Tuesday, January 14, 2014

Quiznos Night!

Megan loves her some Quiznos - especially their broccoli cheddar soup, which was weirdly the best in town. You may have noticed I wrote "was."

Unfortunately all the Quiznos shops in Great Falls have closed, and we didn't find out until we recently tried to go there for toasted subs and soup and to our dismay found the building empty.

We weren't going to let something like a restaurant closing prevent us from eating at it though! In honor of the departed fast food sub shop, we put together our own take on the broccoli cheddar soup and toasted sandwiches.

It seems likely the restaurant probably uses freeze dried or powdered broccoli, but that's not how we roll at home, so of course we're going with fresh broccoli - a whole mess of it!


Once the broccoli is chopped, we got down to the arduous task of grating a whole bag of baby carrots.


As with many soups, we'll be starting ours by cooking diced onions and several cloves of diced garlic in a tablespoon of oil. Put in a few tablespoons of flour and butter to make a roux, which will cause the soup to thicken as it cooks.


After the onion softens and the garlic becomes fragrant, we add in our primary liquid ingredients: half and half, evaporated milk, and homemade chicken stock. For a creamier soup, you could instead use heavy cream, but it also adds a lot more fat.


When it starts to heat through, we add in our chopped broccoli florets, shredded carrot, and 8 oz. of shredded sharp cheddar (it's not, as you might suspect, Velveeta) and let it simmer.


Eventually it will start to thicken and you'll get a consistency that is amazingly close to what we had at Quiznos.


But what about the sandwiches? Here we've cut some wheat bolillo rolls in half and slathered with them a mixture of mayo and sun-dried tomato infused garlic, then layered on sliced tomato, turkey, and cheese.


Since Quiznos toasts their subs, we decided to go the same route, putting the sandwiches under the broiler for about two minutes.


And here's the finished product - a bowl of soup even better than its inspiration and a custom made toasted sandwich. The restaurant may be gone, but it's spirit will live on in our kitchen whenever the urge strikes!


Monday, December 30, 2013

Christmas 2013: Peach mustard pork shoulder, new sides, and a Tardis cake!

If you've been following our blog this year, you'll know that 2013 has been the year of trying new dishes in place of our standard holiday meals.

When Megan and I first started cooking together, Christmas ended up being a repeat of Thanksgiving with turkey and traditional sides. That gets old fast though, with the two holidays so close together, so eventually we switched to a salt roast, where a large cut of beef is encased in kosher salt to roast in its own juices.

Last year we changed that up, trying out a pork version of the classic wellington dish. This year we totally changed the formula, not only switching out our meat, but completely revamping our traditional sides.

Our Christmas dinner this year started with a 7 pound pork butt ("butt" actually being a cut of meat from the shoulder, not coming from the backside as you'd expect) we got on sale for $11 - not a bad price for something that will be feeding a large group.


There was a good deal of fat on the edges, so the first thing to do is clean and trim the pork, then set it down on a layer of plastic wrap.


We're going to rub down the pork with a herb and mustard mixture and let it sit overnight to soak in the flavor. For the marinade, we mixed together rosemary, sage, salt, minced garlic, oil, and dijon mustard.


The marinade is thoroughly rubbed over all sides of the pork. It's messy and doesn't look particularly pretty to start, but trust us - this will make it taste fabulous!


The plastic wrap is then tightly rolled up and the pork butt rests overnight in the fridge.


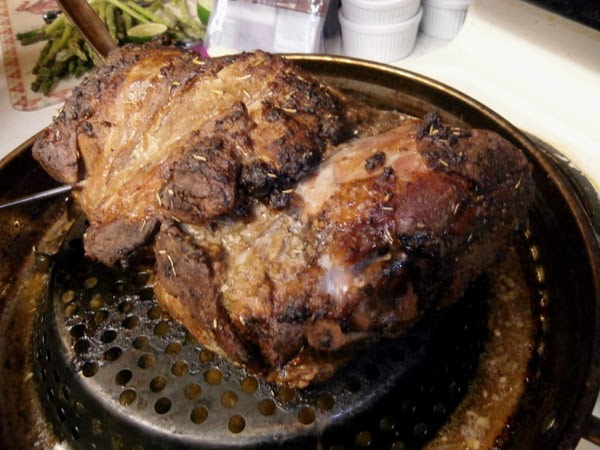
Here's the pork the next day after soaking up all those flavors. To ensure this remains juicy and tender, we're going to cook it "low and slow" for about 5 hours. We've poured a cup of water into the bottom of an oven safe pan, then set the pork on top of another dish actually meant for grilling that is filled with small holes. This lets the juices drip into the pan and keeps the pork moist, without it actually sitting in liquid, which will prevent the edges from getting crispy.


Here it is out of the oven hours later, smelling fabulous and with an amazing bark on the edges.


Here we're finally cutting in, revealing the succulent meat inside!


The edges have a crispy bark ring, while the inside is moist and tender without a hint of dryness.


The marinade isn't the only flavor going on though! We're also going to spoon on a delicious sauce. To start that, we chop up frozen peaches.


The peaches get cooked with white wine, rice wine vinegar, and both dijon and spicy brown mustard. You can really play with the amounts here to get the flavor you want.


But what about our sides? Instead of mashed potatoes and green bean casserole, we're doing something completely different! We'll have two sides - one using red potatoes, and one using asparagus.


Here we're going to bake the asparagus (after snapping off the woody stems of course) in a light coating of oil and pepper.


The red potatoes are cut in half, then set face down on a mixture of parmesan cheese and oil.


Here are the potatoes when they get done baking, with the cheese mixture baking directly onto the top of the potatoes with no effort at all.


And here it is, our finished Christmas meal: a few slices of pork butt covered in peach mustard sauce, a handful of cheese crusted potatoes, and baked asparagus covered in hollondaise sauce. This was a real winner, and everyone left satisfied. These are definitely recipes we'll be using again in the future!


But what about desert? Cristal went all "Cake Boss" on us and made a three dimensional, multi-layer Tardis cake, complete with colored fondant on the exterior!


Monday, December 16, 2013

Chicken and Steak Tacos with Sour Cream Salsa

The tried and true traditional beef tacos are always a great weeknight meal and an old standby we like to fall back on every few weeks for dinner.

Of course it goes without saying, we've found plenty of ways to jazz up that old fashioned classic, from making double-deckers (a softshell taco placed inside a hardshell taco and held together with a layer of beans or sour cream) to our fantastic pulled pork tacos for Cinco De Mayo.

This week we had some ground chicken in the freezer that needed to be used, and I didn't feel like burgers or a loaf, so we decided to try out a new twist on tacos. Besides 1 pound of thawed ground chicken, here are our primary ingredients:


That's about half each of a red onion, green bell pepper, and both poblano and anaheim peppers. If you want it spicier you could do jalapeno or serrano instead, but we didn't need to, because we'll also be making a delicious sauce to go on top.

First the onions and peppers are sauteed in a few teaspoons of oil, and then we add in the chicken to brown (or in this case more accurately "whiten").


Here the chicken is getting its proper coloration and cooking through on the sides, so it's almost time to throw in our seasonings.


Here we're using a combination of store-bought chicken taco seasoning, fresh lime, and about a cup of homemade stock. We put the cover on and let it simmer for 15 minutes or so until it reduces down.


Remember that sauce I mentioned? Well that's actually the real star of this show. This consists of two chopped roma tomatoes, half a diced red onion, a whole diced serrano pepper, two or three handfuls of roughly chopped fresh cilantro, the juice of one freshly squeezed lime, and about half a tub of sour cream.


The end result was good, but I wasn't satisfied with the texture and wanted something more along the lines of salsa, so I threw it in the blender! It came out perfect - not too spicy or too calm, and every bite gets you all the flavors of the veggies and lime.


Our tacos are nearly ready, but of course we need a few more additions first. To match our unique tacos we decided to ditch the traditional iceberg lettuce and go with freshly shredded cabbage instead. We're using colby jack cheese, but pepper jack or any others would be great as well.


Now that the filling is cooked through, we plop some down on a few warmed up tortillas.


Next up we add on some shredded cheese and cabbage.


Now it's time for the sour cream salsa!


Here are two delicious finished chicken tacos. These turned out great, and are less like a Wednesday night dinner and more like a Mexican restaurant meal.


We had lots of sour cream sauce and cabbage left, so we needed to have a second meal to use them with. We decided to go for a double helping of tacos, but this time using steak instead of ground chicken! We marinated thin steak medallions in a mixture of lime, oil, water, and mexican seasonings for a few hours, then sliced the meat into small strips.


Like the night before, we're first cooking peppers and onions, then throwing in the meat to sear on each side.


Instead of using stock and taco seasonings, this time we used our marinade to flavor the filling. Remember to cover and turn up the heat when adding more marinade at the end to make sure you kill any bacteria, since it's been in contact with raw meat for hours.


Here are our finished steak tacos with sour cream sauce, ready to be eaten!